Sunday, July 28, 2013

Ginger rebuild Part VIIII


With the hull complete it was time to deal with the deck. Ginger, being an old wooden boat, had a traditional wooden deck that was covered with heavy duck canvas, glued down and painted many times to make it waterproof. This deck had many patches and leaks in it and needed to be replaced. To do this all of the trim boards had to be removed and the old canvas pulled up. The deck and cabin top cleaned, prepped and new canvas cut to shape. Then a gallon of glue was rolled onto the surfaces and the new canvas was squeegee down into the glue. Afterwards, I stapled the edges of the canvas into place, trimed it back and installed new trim boards. With the application of 4 coats of paint, Ginger had clean new decks and a waterproof top! A lot of work just to keep the rain out.
Removing the old trim and...

Hundreds of staples, yuck

Pealing the old cabin top off.

this was the forward deck canvas

rolling on glue just like it was paint

stretching the canvas and...

forcing the glue up into the weave of the canvas.

hundreds of staples going back in

Ready for the final trim

Before that I had to tap in every staple to make them flush.

The final product. Looks great.


Thursday, July 25, 2013

Ginger rebuild Part VIII


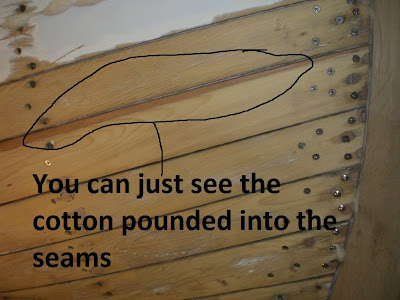
On a wooden boat, once you have the planking finished the boat will still sink unless you “calk” and “pay” the seams. Calking is the act of pounding cotton or oakum into the seams and paying is applying a compound to fill the seams until the bottom is smooth. Now that the planking was done it was time to start putting cotton into the seams. These are the tools of the trade for a caulker. A mallet, calking iron and for me, a calking wheel.
The mallet isn't a true "calking" mallet but it worked for me

I put a line on the calking iron to show me how deep I could go.
 
You take a rope of loose cotton and carefully work it into the seams then use the roller to force it smoothly down into the seams.
The cotton must be looped into place as you go across the seams. this alows you to add tighter loops (more cotton) or to stretch out the loops (less cotton).

You can just see the looping of the cotton in the seams

rolling the seams

Afterwards, you use the calking iron to set the cotton into the seams by pounding it gently but firmly into place.
Setting the coton with the calking iron.

When I finally got all of the cotton into the seams, I put rubber paying compound into the seams and filled all of the screw holes.


Seams filled, holes filled ready to sand and paint.
Ginger was now ready to sand and apply paint.

Sunday, July 21, 2013

Ginger rebuild Part VII, Planking


I know, this blog about the Ginger is getting to be a bit long but it did take 6 months of work to finish the boat and a few of you might enjoying reading about how it was done. For the rest of you… well, it’s going to be about another 5+/- posting about the rebuild before I go back to other mundane stuff so hang in there.

Now that the front and the back end of Ginger was replaced I could start on the planks. I must tell ya’ll that this was a despicable job. Dirty, filthy old paint on the outside and black Yuck on the inside. All of this had to be scraped off before I could start in on repairing the planks. I already had the first 4 planks off and so I started on them. All of the old screw holes had to be plugged and many of the planks had cracks or  large checks(checks are the natural splitting that occurs in wood) in them that had to be router out and inserts glued into place.

Every old screw hole had to be pluged.

Then the cracks and the checks had to be routered and filled.

 It was a long and tedious job. When they were repaired and ready to go on again I beveled a new edge on each one as I set them into place. It took all of my clamps to install the first few planks. After that, I had to make “rib clamps” to do the rest.

Finally, the first couple of planks were installed. They look good, the wood is repaired and the seams tight again.

 A rib clamp squeezes around a rib and provides a place to lightly set in wedges that hold planks in place while you screw them down.

I made a dozen of these and they worked out very well.

As I moved away from the keel, I had to have a way to hold the planks against each other. These clamps and soft wood wedges could push and hold the planks against their neighbors while I drilled and screwed the plank down.
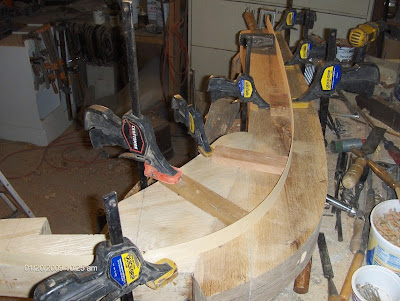
After the first four planks were back on the boat, I started on the planks at the turn of the hull. This area is where all of the broken ribs occurred. To strengthen and repair this area first I had to make up short, sister ribs that would ride between the old ribs to strengthen the hull in this area. To make them I steam bent short oak rib pieces and bent them to the curve of the hull. It took about 1 hour to completely steam a rib and then (in about 30 sec)I would pop them out of the steam box and clamp them into place. The entire center section of the boat had to have sister ribs installed.

These sister ribs had just come out of the steam box and are bent against the hull of the boat as they cool and assume their new shape.

The starboard side sister ribs are ready to be screwed into place as soon as the planks in this area are finished and installed.
 

At the same time I began to reatatch the repaired forward planks to the new front stem.


I kept installing the rest of the planks until I reached the water line where the planking was in good shape. The final plank came up short of it’s neighbor (because of cleaning up the plank edges and pushing the planks back together again) and I had to add a long strip to its edge to make up this difference. After the glue was set, I carefully wedged the final plank into place and screwed it down. Ginger was now a boat again!

1-1/2 inch gap to fill
 
Glueing the plank edge onto the old plank.
 
The last day of planking, installing the "wiskey" plank (called that because you open the wiskey bottle after it is fastened!)
 
Tired but happy.

How the shop looked afterwards.
Now, on to the rest of the rebuild.

Thursday, July 18, 2013

Ginger rebuild Part VI, building a new back end


Ginger also had major issues with the aft end of the boat. The keel had a twist to the starboard side and the aft timber had separated from the keel. Someone in the past had put plates of galvanized steel on either side of the keel to hold things together and they were rusting out. The aft timber was in bad shape too and needed to be replaced. I had to remove more planks to gain access to the aft end and remove some of the transom too. It was a big job but blessedly, not as big as the front end turned out to be.
Ginger had a constant right hand turn going on.
 

You can see where the steel plates were bolted on.

After a lot of work, the old timber came out.

Removing part of the transom

To straighten the keel I added an oak patch to the farside of the keel and shaved off this side until it was straight.

Making a template of the new aft timber. Notice the knotch I put into the keel? It will lock in the new aft timber.

Cutting out the new aft timber.

Installed! A nice tight fit, ready to be bolted into place.

The finished product with the propeller shaft reinstalled.

Wednesday, July 17, 2013

Ginger rebuild Part V, building a new front end


Now that I had removed the front timbers from Ginger I had to make replacement timbers luckily, I happened to have a large piece of aged white oak in the shop that I could glue together to make a blank large enough to cut the new pieces out of. After rough cutting the pieces out of the blank, I had to shape them and bolt them together to form the new front assembly. Then came the task of cutting in the mast step, drilling the new bolt holes needed for attaching them to the keel and finally carefully cutting the cutwater into the leading edge of the forward timber. After a bit of sanding the new forward timber assembly was ready to go back in.

Afterwards, while the planks were off I also replaced the aft timbe,,, but that's the next posting.

Cutting the old bolts apart


Because I was doing the rebuild in the winter I had to tent the glue job over and heat the area for the night to make the epoxy set.


The blank is finished, and cut to size. Now, I position the old pieces and trace them out before cutting them from the blank.


Notice the large areas of cracks and checks in the front timber.


The new and the old


After glueing the two pieces together I had to cut in a new mast step area. First the cutting...


Then taking the thin pieces out.


Ready to be bolted together.


Drilling the bolt holes for the main timbers and the keel bolts.


Laying out the curvature of the cutwater. This was tricky for you want the line to be in the proper place and have a fair, eye pleasing curve to it.


Next, removing the excess wood...


then cutting it away.


The final assembly, glued together, bolted tight, cut, shaped and sanded. Ready to be bolted back into Ginger.